> ## Documentation Index
> Fetch the complete documentation index at: https://docs.bluprynt.com/llms.txt
> Use this file to discover all available pages before exploring further.
# KYI Widget SDK quickstart
> Embed Bluprynt KYI verification in your app in three steps.
This guide gets the [KYI widget](/sdk/overview) running on your page. Your server mints a short-lived token, and your frontend opens the widget in a drawer. For what the widget does after it opens, see [Verification flow](/sdk/flow).
 ## Before you start
* **Credentials.** Send your Bluprynt representative every origin that will embed the widget, including staging and local development (for example `https://app.example.com` and `http://localhost:3000`). You get back a partner ID and a `SECRET_KEY`. Store them as `KYI_PARTNER_ID` and `KYI_SECRET_KEY` on your server.
* **Runtime.** `generateToken()` needs Node.js 18 or later. For other languages, see [Access tokens](/sdk/tokens#python).
* **Signed-in members.** The token endpoint needs to know who's asking, so it sits behind your own authentication.
```bash theme={"system"}
npm install @bluprynt/kyi-widget-sdk
```
```ts server.ts theme={"system"}
import express from 'express'
import { generateToken } from '@bluprynt/kyi-widget-sdk/server'
const app = express()
// requireLogin: your own session middleware; it sets req.user
app.post('/api/kyi/token', requireLogin, async (req, res) => {
res.set('Cache-Control', 'no-store')
const issuer = process.env.KYI_PARTNER_ID
const secretKey = process.env.KYI_SECRET_KEY
if (!issuer || !secretKey) return res.status(503).json({ error: 'kyi_not_configured' })
try {
const accessToken = await generateToken({
issuer,
secretKey,
userId: String(req.user.id), // from the session, never from the request
expiresIn: 3600, // seconds
})
res.json({ accessToken })
} catch {
res.status(502).json({ error: 'kyi_token_failed' })
}
})
```
Keep `KYI_SECRET_KEY` on the server. Take the user ID from your authenticated session: if your endpoint reads it from the request, anyone can open someone else's verification.
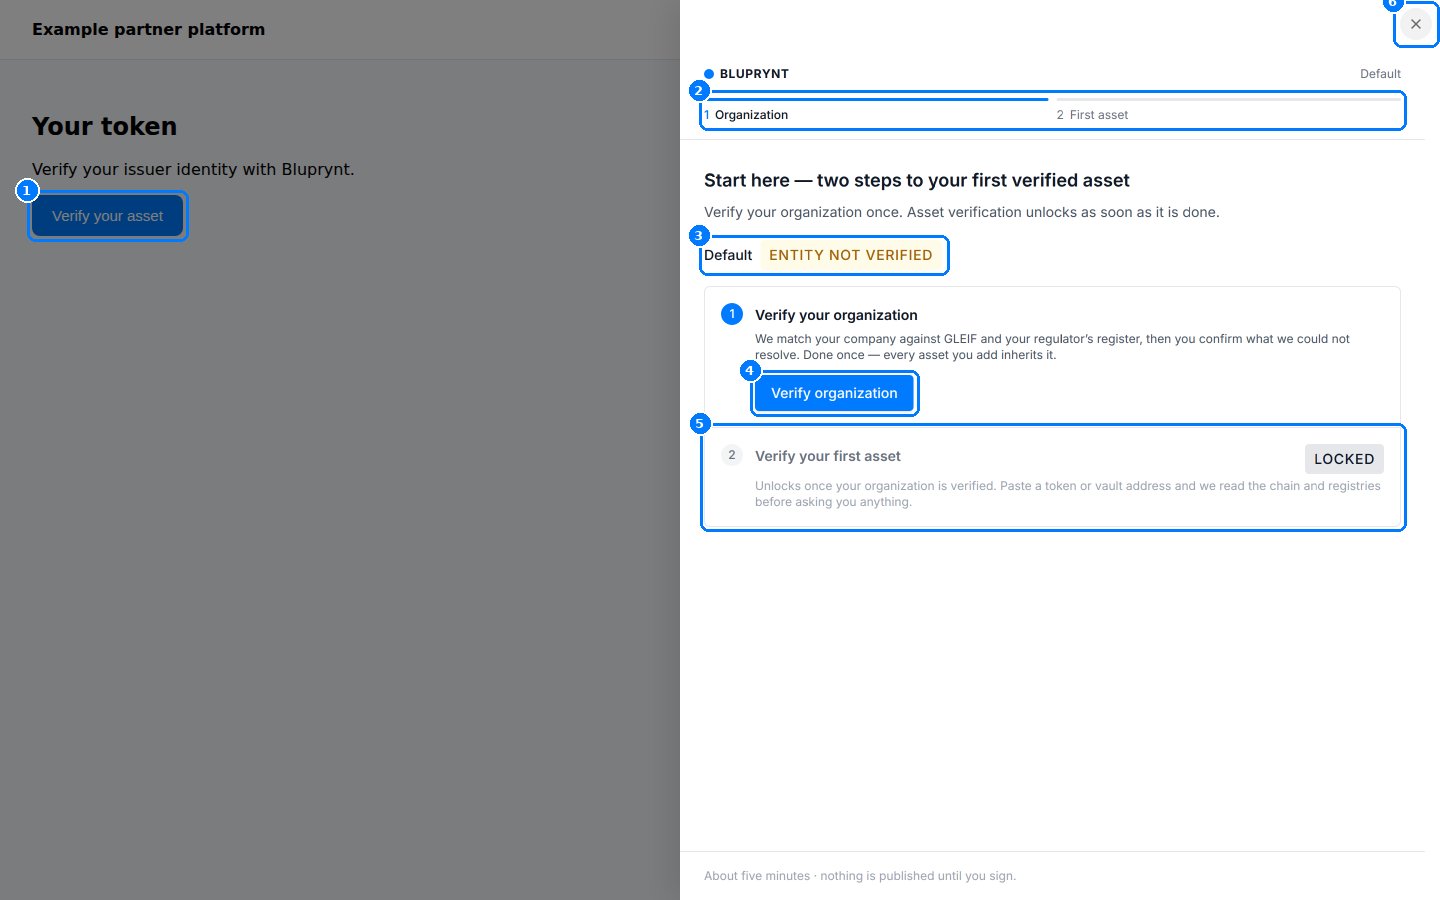
Mint a fresh token every time you open the widget. The drawer slides in from the right, and it closes on the close button, a click outside it, or `Escape`.
```ts app.ts theme={"system"}
import { kyi, type KYIWidget } from '@bluprynt/kyi-widget-sdk'
let widget: KYIWidget | null = null
document.querySelector('#verify')!.addEventListener('click', async () => {
if (widget) return // already open
const res = await fetch('/api/kyi/token', { method: 'POST', cache: 'no-store' })
if (!res.ok) return showError(res.status)
const { accessToken } = await res.json()
widget = kyi('drawer', 'kyi', accessToken, {
onReady: () => console.log('Widget loaded'),
onClose: () => { widget = null },
onError: (error) => console.error(error),
})
})
// When your page or component goes away:
// widget?.destroy()
```
| Scope | Opens | Screen |
| - | - | - |
| `kyi` | The verification flow: KYB, add an asset, sign wallets. | [Flow](/sdk/flow) |
| `asset-list` | The organization's assets and their KYI status. | [Assets](/sdk/flow#the-asset-list-scope) |
| `wallet-list` | The organization's verified wallets. | [Wallets](/sdk/flow#the-wallet-list-scope) |
## Check it works
1. Sign in to your app on an allowlisted origin and click your button.
2. The drawer opens and shows **Start here — two steps to your first verified asset**. `onReady` logs `Widget loaded`.
3. Close it. `onClose` fires and the next click opens a new drawer.
If the drawer stays empty, your origin isn't allowlisted yet. See [Errors and troubleshooting](/sdk/errors).
## Next
Every screen, step by step.
Next.js, Flask and FastAPI endpoints.
The checklist before going live.
A complete Next.js integration.
This documentation is built and hosted on [Mintlify](https://mintlify.com), a developer documentation platform.
## Before you start
* **Credentials.** Send your Bluprynt representative every origin that will embed the widget, including staging and local development (for example `https://app.example.com` and `http://localhost:3000`). You get back a partner ID and a `SECRET_KEY`. Store them as `KYI_PARTNER_ID` and `KYI_SECRET_KEY` on your server.
* **Runtime.** `generateToken()` needs Node.js 18 or later. For other languages, see [Access tokens](/sdk/tokens#python).
* **Signed-in members.** The token endpoint needs to know who's asking, so it sits behind your own authentication.
```bash theme={"system"}
npm install @bluprynt/kyi-widget-sdk
```
```ts server.ts theme={"system"}
import express from 'express'
import { generateToken } from '@bluprynt/kyi-widget-sdk/server'
const app = express()
// requireLogin: your own session middleware; it sets req.user
app.post('/api/kyi/token', requireLogin, async (req, res) => {
res.set('Cache-Control', 'no-store')
const issuer = process.env.KYI_PARTNER_ID
const secretKey = process.env.KYI_SECRET_KEY
if (!issuer || !secretKey) return res.status(503).json({ error: 'kyi_not_configured' })
try {
const accessToken = await generateToken({
issuer,
secretKey,
userId: String(req.user.id), // from the session, never from the request
expiresIn: 3600, // seconds
})
res.json({ accessToken })
} catch {
res.status(502).json({ error: 'kyi_token_failed' })
}
})
```
Keep `KYI_SECRET_KEY` on the server. Take the user ID from your authenticated session: if your endpoint reads it from the request, anyone can open someone else's verification.
Mint a fresh token every time you open the widget. The drawer slides in from the right, and it closes on the close button, a click outside it, or `Escape`.
```ts app.ts theme={"system"}
import { kyi, type KYIWidget } from '@bluprynt/kyi-widget-sdk'
let widget: KYIWidget | null = null
document.querySelector('#verify')!.addEventListener('click', async () => {
if (widget) return // already open
const res = await fetch('/api/kyi/token', { method: 'POST', cache: 'no-store' })
if (!res.ok) return showError(res.status)
const { accessToken } = await res.json()
widget = kyi('drawer', 'kyi', accessToken, {
onReady: () => console.log('Widget loaded'),
onClose: () => { widget = null },
onError: (error) => console.error(error),
})
})
// When your page or component goes away:
// widget?.destroy()
```
| Scope | Opens | Screen |
| - | - | - |
| `kyi` | The verification flow: KYB, add an asset, sign wallets. | [Flow](/sdk/flow) |
| `asset-list` | The organization's assets and their KYI status. | [Assets](/sdk/flow#the-asset-list-scope) |
| `wallet-list` | The organization's verified wallets. | [Wallets](/sdk/flow#the-wallet-list-scope) |
## Check it works
1. Sign in to your app on an allowlisted origin and click your button.
2. The drawer opens and shows **Start here — two steps to your first verified asset**. `onReady` logs `Widget loaded`.
3. Close it. `onClose` fires and the next click opens a new drawer.
If the drawer stays empty, your origin isn't allowlisted yet. See [Errors and troubleshooting](/sdk/errors).
## Next
Every screen, step by step.
Next.js, Flask and FastAPI endpoints.
The checklist before going live.
A complete Next.js integration.
This documentation is built and hosted on [Mintlify](https://mintlify.com), a developer documentation platform.